The new Windows 10’s default settings are pretty smart, but here’s a step by step guide to tweaking the new OS to work and feel the way you want it to look.
Introduction & Tips
Like previous versions of Windows, Windows 10 comes with a host of features and choices set up preferably the way the OS manufacturer Microsoft thinks you as the end user might like them. But still like before, Windows 10 allows you to customize all most all of them, so that the Operating System works more to your liking.
How do you tweak the OS?
That is precisely what we will be discussing with this post.
Windows 10’s tweakable includes a ton of personal choices: the previous style Start menu or the Windows 8 design Start screen, the colors of your Start Menu area, the background image, the Lock screen image, and the size of the fonts and text that Windows display, your default internet browser, and your privacy settings. Just starting with these basics fundamentals, you can tweak Windows as much as you wish, until it looks just perfect although at some point, you will want to actually stop configuring and start using the latest version. Visit Techmsd for ‘How to Download Windows 8 Pro for Free’.
How to find and test settings that are configurable with Windows 10.
Microsoft Inc. has included more functions to its default settings, so you will find yourself visiting the old Control Panel (Windows) much less frequently. But Windows still is not an easy operating system to navigate unless you are familiar with tweaking its settings over the years. Even in the Settings screen, you still have to figure out where to go to find a particular setting, and how to adjust it.
No need to worry, because that is where we come in. Keep reading, and you will uncover 2 ways to personalize your desktop on Windows 10, including where to find the appropriate screens and just how to fine-tune them. After making the most of these changes, hopefully you will discover that Windows 10 is a very appealing place to work and play with.
2 Basic Ways to Customize your Windows 10
- Rainmeter Gallery
- Default Windows 10 Start Menu
1. Rainmeter Gallery

Rainmeter Skins contains hundreds of image skins grouped under category headings.
Tired of the same old, boring Desktop background of yours? Check out this list of a few of the very best Rainmeter skins available, and turn your desktop into a center of attraction that all others will love. The time has come to reinvent your very own amazing desktop theme for backgrounds. You can easily do that with this software called Rainmeter skins.
Free and easy to install Rainmeter skins, suites, and lots more. Make your desktop background stand out.
Installing Rainmeter Skins
There are two different ways to install Rainmeter skins applications downloaded over the internet:
- Automatic Rainmeter installation
If the file format of the skin is in .rmskin extension, double click the .rmskin file, click Install.
- Manual Rainmeter installation
If it’s a compressed file such as a .zip file, .rar file, or .7z archive.
In a nutshell, unzip the archive to the Rainmeter Skins folder.
Then refresh Rainmeter.
For more details check our complete list of skins.
- Your Default Windows 10 Start Menu
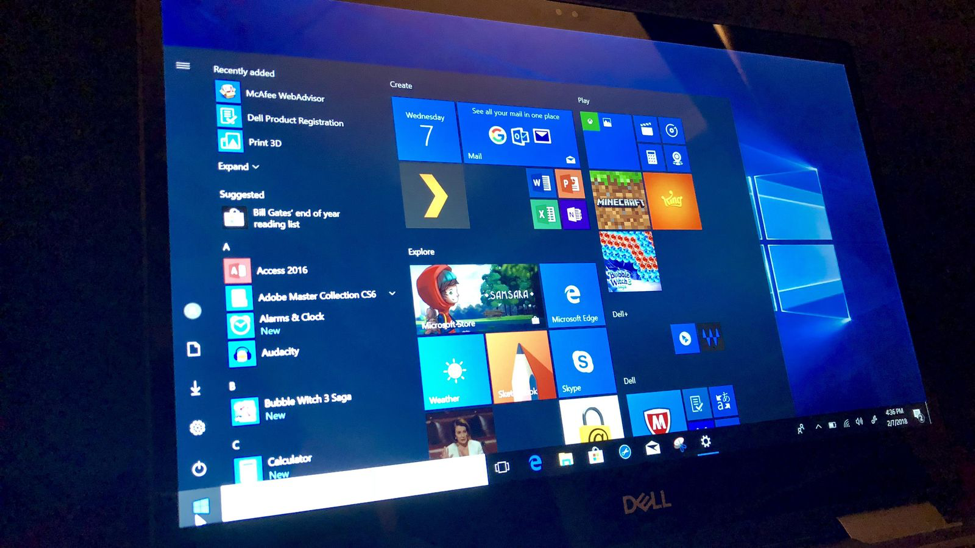
How to Choose Your Default Windows 10 Start Menu
In Windows 10, Microsoft has resuscitated the much missed Start menu for PC users who have a preference for it to the more touch and tab-focused Start screen introduced in Windows 8. But that doesn’t mean that the Start screen has been bumped off entirely.
Trying to gear itself toward Personal computer and tablet users, Windows 10 offers both the Start menu and the Start screen, so you can choose which one you prefer. Users of hybrid-style computers that transform between physical laptop and tablet modes may find themselves jumping between the Start menu and Start screen. So how can you personalize Windows 10 with the Start mode of your choice?
Let’s say your PC already has the Start menu setup as the default, and you want to switch to the Start screen. With your cursor, click the Start button and then click on Settings.
From Settings screen, click on the setting for Personalization.
Then from the Personalization screen, select the category for Start. In the right side, switch on the switch to Use Start full screen.
Select the Start button, and you will now see the Start screen in all of its full-screen glory.
To switch back to the Start menu at any time, just turn off that same switch.
- How to Change the Color and Transparency of the Windows 10 Start Menu or Start Screen
Don’t like the default color of the Windows 10 Start menu or Start screen? No problem. You can give it to a different paint look that’s more suited to your tastes. You can also make the Start menu or Start screen transparent to give it a bit more stylish.
Let’s play around with the color of the Start menu/screen. Click the Start button, then select the Settings command.
From the Settings screen, click the category for Personalization.
Right from the Personalization screen, click on the setting for Colors. In the “Choose a color” section, switch on the option to “Automatically pick an accent color from my background.”
Click on the next option to “Show color on Start, taskbar, and action center.”
Now click on the Start button, and you’ll see that the Start menu or screen takes on the same accent color as your background picture.
Back at the Colors setting, switch off the option to “automatically choose an accent color from my background.” Now select an accent color from the colour palette.
Again, click on the Start button, and you will see that the Start menu assumes the same accent color as the one you chose.
Back at the Colors setting, scroll further down until you see an option to “make Start, taskbar, and action center transparency.” Select that option.
Again, select the Start button and you’ll see that the Start menu is now partially showing windows and some other elements beneath it in semi-transparent fashion.
- How to Change Your Windows 10 Background Display Image
Not crazy about the image that Microsoft uses for your background image?
You can easily change that. Microsoft offers its own gallery of photographs, but you can also use one of your own images if you’d prefer to spice up Windows 10 with a more personal touch.
Right-click on any empty area on the desktop. From the popup options that shows up, select the Personalize command.
From the Personalization screen, make sure the setting for Background is activated.
On the right pane, click the drop-down menu under Background. Choose Picture, then Solid Color, or Slideshow. This time choose Picture for this option.
If you wish to use a picture from Microsoft’s small gallery, choose it from the row of thumbnails. The picture you chose is applied on your background.
If you want to use a different picture saved on your computer, click the Browse command and select the folder where the picture you wish to use is stored and apply it.
Your picture is then applied to your desktop background. You can even tweak around with an actual size and centering of the desktop background image by resizing or rescaling it. In the Choose a Fit section, click the desired choice for your desktop background image. The best option is to have it centered on your PC.