In this article today we are going to learn about why laptops do not charge, even when they are plugged in. This problem often arises in Windows 10 laptops. Your windows 10 laptop may have a non-removable battery, don’t worry we will give you some ideas to solve this problem.
This problem mainly arises due to faults in the charger, faulty battery, old drivers, or some changes in the Power and Sleep settings. These are a few reasons for the laptop not charging. According to us, this is the worst problem ever faced by a user. The laptop is an essential day-to-day need nowadays.
Contents
- 1 #1 Check whether the button on the charging socket is on
- 2 #2 Updating Drivers for plugged in not charging
- 3 #3 Check Power and Sleep Setting
- 4 #4 Removing the battery
- 5 #5 Seek the help of Experts
- 6 Why does my laptop charger icon flicker when I play games?
- 7 Why does my charger say it is plugged in, but it’s not charging?
- 8 Check the AC power supply is connected properly
Don’t worry we will try our best to solve the problem of the windows 10 laptop not charging even if it is plugged in issue. We are going to give you some small fixes for this issue. This issue can get big and may lead to battery dead. So, try to fix this error right away.
This fix may or may not work for Windows 7 as it is considered as a Dead OS. If you’re running a Windows 7 laptop, then you can try other fixes which are working promptly for Windows 7. So, now let’s fix the laptop plugged in but not the charging issue.

These are a few steps that will help you out to solve the plugged in not charging error:
First thing first, check whether you have plugged in the charging properly inside the socket and the switch is on. Many of the users forget to switch on the button and start blaming the laptop. So, double-check whether you have plugged in properly and the switch is turned on.
You can also check if the charging port of your laptop is properly working or not. If you think the charging port is not working then visit an expert, don’t try to open up the laptop at home.
This fix can solve your laptop plugged in and not charging issue.
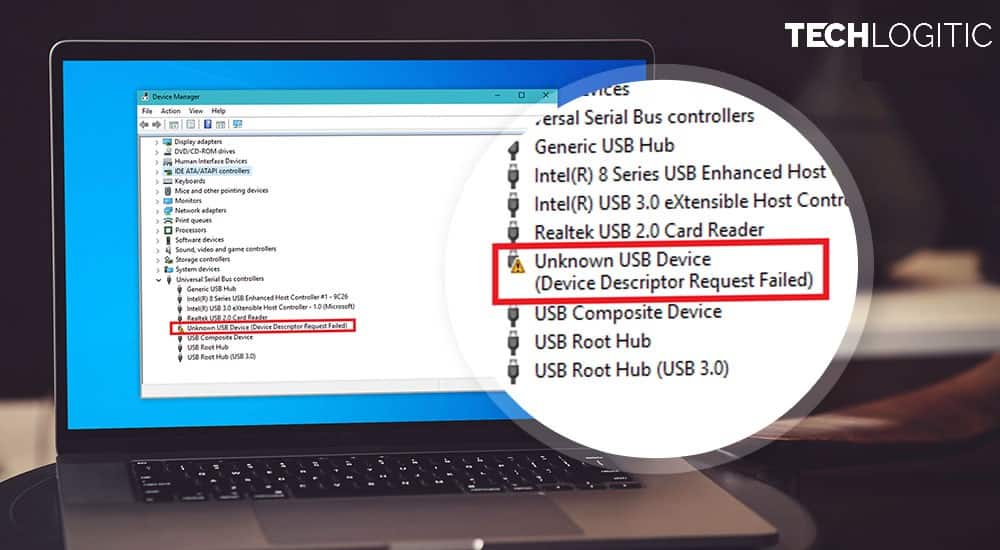
#2 Updating Drivers for plugged in not charging
If your laptop has got some juice then try this method. Faulty Microsoft AC Adapter drivers can cause laptop plugged in and not charging issues. To update the drivers follow the steps written below.
- Press the Windows button and type Device manager in the search tab
- Search for Batteries, click on the drop down arrow
- Right click on Microsoft AC Adapters.
- Click on Update drivers
- Click on Search automatically for drivers
- Wait until the process gets over
- Inside batteries also update the drivers for Microsoft ACPI-Compliant Control Method Battery.
Windows will automatically search and install the latest drivers. After installing the drivers, restart your laptop. This solution can fix your laptop plugged in and not charging on Windows 10 successfully. If the problem still persists then try out the next method.
#3 Check Power and Sleep Setting
The laptop plugged in and not charging can arise due to problems in the settings. For the Windows 10 laptop, follow the steps written below.
- Press the Windows button and search for settings in the search tab.
- Click on system or directly search for Power and Sleep in the search bar.
- Click on the Additional power settings, which is situated below the Related settings Tab.
- Click on Change plan settings
- Change the settings as per your need and check whether the laptop is charging or not.
- This fix can also help you to solve the laptop plugged in and not charging issue. Try changing the settings to Never, which will help you to understand whether it is causing the issue or not. If you’re a Mac user then try the steps written below.
- Go to system and Preferences
- Click on Energy Saver
- Check the settings and change it if needed.
#4 Removing the battery
If your laptop is plugged in and still it is not charging then try to remove the battery. The laptop not getting charged because of the fault in the battery is faced by many users. So to remove the battery, follow the steps written below.
- Drain out all the batteries from the Laptop.
- Unplug the charging cable.
- It will eventually get shut down, flip your laptop upside-down.
- Remove the battery locks, which are situated on the backside of the laptop. In every laptop, there are two locks that you have to remove in order to take out the battery. Just push the sliders on either side to unlock the battery.
- Remove the battery.
- After removing the battery, if you see any bump on either side of the battery, then it’s time to change the battery. If your battery looks fine, then insert the battery back into the slot and plug the charger back in. Check whether the laptop is charging or not.
This fix can also be used by mac owners. This fix will only work if the battery of your laptop is removable. This has the potential to solve your laptop plugged in and not charging issue. If the problem still persists then try out the next method.
#5 Seek the help of Experts
If you are new to the laptop world then taking the advice of experts can be helpful. There are many computer repair shops around your home, check the best servicing shop and visit it. Check the price of the components in multiple shops and choose the one with the best offer, which can save your money easily.
If your Laptop is in the warranty period, then do not hesitate to visit an authorized service center. You can get free of cost repairing, which is provided in the warranty period. If the warranty period of your laptop is over and it is giving problems, then it can be a costly job in an authorized service center. To save some money, visit local shops.
Taking expert advice is a necessary job in conditions like this. If all the steps written above fail to work then getting expert advice is recommended by us.
These were the few fixes that are able to solve the laptop plugged in and not charging on Windows 10. Try out all the fixes, one of them will definitely work for you. Now further down in the article we will address some issues related to the battery and its charger.
Why does my laptop charger icon flicker when I play games?
This issue is faced by many Windows 10 users. Even when the current is proper, then also the charging flicker while playing games results in the flickering of the screen.
This problem arises due to the fault in the charger. If you have replaced the charger with the low watt charger, then this problem can arise. So, try to use the original charger. If you are already using the original charger, then your battery is no longer of use. You need to replace your battery. Your battery is not capable anymore to take that much charge, which is needed by a game to work smoothly, giving constant FPS.
Why does my charger say it is plugged in, but it’s not charging?
This issue is formed due to a faulty battery; you can try the tutorial which is given above in this article.
If your laptop is not charging fully, then you can try to troubleshoot in Windows 10. To troubleshoot follow the steps written below:
- Open Settings app.
- Click on Update and Security.
- Scroll down and click on Power.
- Click on Run the troubleshooter.
You can easily troubleshoot if your battery is not charging fully. After troubleshooting, if the problem still persists then try to replace the battery. How to remove the battery guide is stated above in this article. You can replace the battery yourselves only if the laptop supports a removable battery or else you need to hire an expert.
Solving the issues preventing your laptop’s battery from getting charged.
Here are some simple steps to stop the issues that are preventing your laptop from getting charged.
- Run windows 10 battery diagnostics.
- Running battery diagnostics will let you know the exact problem and can also fix this issue by tweaking some settings of your laptop. Follow these steps to run the battery diagnostics.
- Open Settings app.
- Click on Update and Security.
- Scroll down and click on Power.
- Click on Run the troubleshooter.
- Complete the wizard, and check whether the battery is getting charged or not.
Check the AC power supply is connected properly
The AC power supply brick can malfunction sometimes, so check it thoroughly. Buy a new one if needed, don’t try to repair it at your home, hire an expert.
Try different Wall Outlet
Try different wall outlets in your home. If the laptop is getting charged at a different wall outlet, then no need to worry it’s just your wall outlet malfunctioning.
Also, do check for the voltage. If the voltages are fluctuating, wait for some time and turn on the charging after everything is OK.
Test another charger
If you have different chargers at home then try to use another one. This can solve the laptop plugged in and not charging issue. But try the exact same watt charger to reduce the chances of bricking the battery.
Remove all external devices
Remove all the external devices like mouse, keyboard, speakers, or LAN cables. Sometimes the USB or the Lan port can malfunction. Disconnect all the devices and try to charge the laptop
Clean the dirt inside the charging port
Dirt that gets stuck inside the charging port can cause the laptop to be plugged in and not charging. Clean the charging port before using it.
These were a few FAQ’s which will help you to solve all the problems related to the battery and the charger. This was our in-depth article on laptops plugged in and not charging. Hope this article helps you a lot.