In this day and age, media files, like video and music, have become an indispensable part of life. Much of the time, besides watching videos, people will also create a personalized video of their own and share it with friends after cutting and editing, like trimming off some unpleasant segments, adding own voice-over or classical music, applying special effects to make it stunning, etc. For the fulfillment of all these, a practical video editing tool is a must. Out of a variety of available editing software, we recommend Joyoshare Media Cutter, as it is hailed as the most reliable and cost-effective one.
- A Quick Introduction
Joyoshare Media Cutter is one of the most dedicated audio/video editing software, working the same in both Windows OS and Mac OS. Aimed for broader user groups, it sports a conveniently condensed interface, which makes it accessible to beginners and professionals.
Using this program, whatever you import audio and video files, it can help you to cut and merge them without loss in quality and frame. More than that, the video cutter is also has the ability to convert your files to any desired format and edit them in a professional manner.
- Prominent Features
Joyoshare video cutter software is developed with a mass of amazing features to shine your video and audio files and turn video editing into something fun. Below is a list of its highlighted functions.
Interface: It comes with a pared-down and simple interface. Even for novices, it is much easy to handle.
Format: It well supports all popular media formats including MP4, MP3, M4A, M4V, MOV, MKV, VOB, WMV, WMA, 3GP, OGG, FLV, TS, MTS, HD, 4K, MPEG, FLAC, AC3, M4B, etc., as well as device-compatible formats like Apple, Samsung, smart TVs, game consoles, and more.
No quality loss: It is equipped with a lossless mode to cut, split, and merge video and audio files without loss of original quality and frame.
Built-in editor: It provides a wealth of editing tools to enhance video by appending effects, background music, subtitles, watermarks, or trimming, cropping, flipping, etc. More, you also extract audio from your video with keeping the original quality.
Parameter customization: It features an encoding mode to freely change file format parameter, such as resolution, bit rate, frame rate, sample rate, channel, and codec. If you are tech-savvy, this is wonderful for you.
60X-speed conversion: It realizes the conversion, cutting, and merging of video and audio at 60X quicker speed. In the meantime, no quality loss is caused. Very few editing software can do that.
Cutting precision: It carries with real-time preview, key frame, and time adjuster, which empowers you to efficiently cut video or audio with millisecond precision. You are able to preview the cutting results at any time so as to adjust promptly if dissatisfied as well.
- How to Cut and Edit Video?
To cut video or edit with Joyoshare Media Cutter, please go to its official website to get it download on your computer. After installing and launching it, do as follows.
Step 1: Add target file
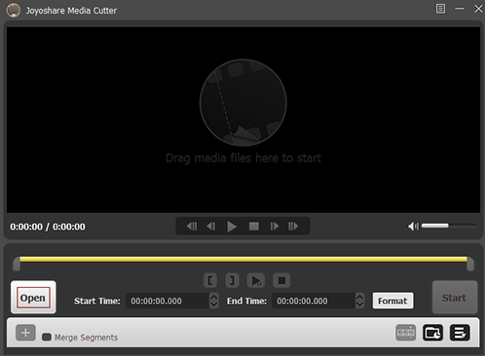
To add video files, please locate “Open” button in its clean main interface to open your local folder and select the target files to upload. Alternatively, you can do it by way of drag-and drop.
Step 2: Select a mode
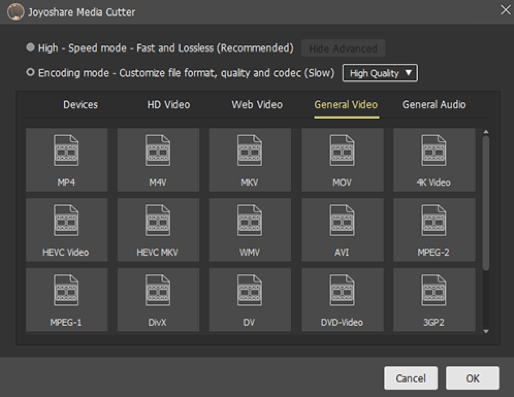
Next, proceed to the formatting window by “Format” button, in which you have to specify a mode and an output format. To cut video losslessly, the high-speed mode is your best choice. If you want to do both cutting and editing, you should highlight the encoding mode. Only in this mode will the editing features are activated. Whereafter, select a required output format and further redefine its codec, resolution, bit rate, frame rate, channel, etc.
Step 3: Cut video file
Subsequently, get back to the first interface and start cutting video. To cut needless sections off the video, you have 3 ways, the simplest one of which is to slide the time controller to any desired position. What beyond the yellow timeline is to be cut. For cutting with more accuracy, you could use key frame buttons and set segment start/end time using brace icons, or manually enter the start time and end time to decide what is retained.
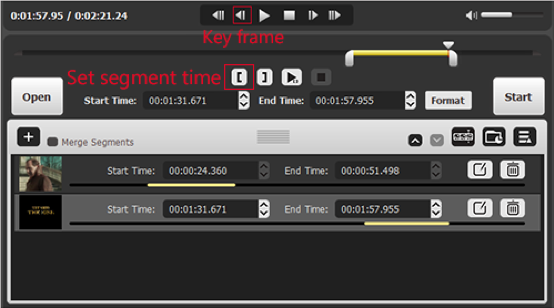
If you want to cut the video into several segments and merge the cut parts together, tap on “+” icon to produce another video files and cut them as the above. To merge, remember to tick “Merge Segments” before exporting.
Step 4: Edit video file
After cutting, click on “Edit” button to get into the editing window and you will be presented with several editing tools. What each tool focuses on:
Trim
This feature allows trimming video and taking a snapshot. To trim, drag the left time handle to the start point and the right time handle to the end point. Then, click a scissors-shaped icon. To snapshot, touch a camera-shaped icon.
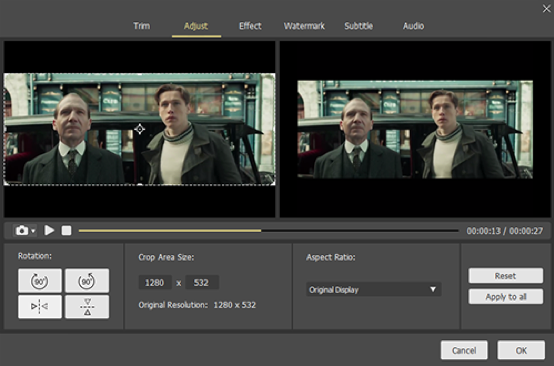
Adjust
The “Adjust” tab Hammers at video cropping, rotating, and flipping. To crop: move the white dotted cropping window to zoom in and zoom out or set specific values of width and height to determine the crop area size. In “Rotation” section, rotate video 90, 180, 270 degrees clockwise or counterclockwise as well as flip video vertically or horizontally. More, you are also enabled to adjust the aspect ratio of the video to Full Screen, Pan Scan, 16:9, 4:3, etc.
Effect
Obviously, this option is designed to freely adjust the brightness, contrast, saturation, and hue of the video. Besides, various visual effects and frames are provided.
Watermarks
Another stunning feature is creating personal watermarks in image or text and supporting adjusting the position, font, color, transparency, etc.
Subtitles
This option is devoted to embed subtitle files of SRT, ASS, SUB, SUP, LRC, SSA, SMI, etc to the video. Else, you get the permission to change the position, margin, transparency, scale, font, color, size of subtitles.
Audio
The “Audio” feature lets you mute video and add your own audio track to the video. Also, you can make the audio track more attractive by using sound effects or controlling volume and weight.
Step 5: Export the video file
Finally, head to the “Start” in the main window to export and save the edited video. When the progress bar comes to an end, the local folder storing the exported video will pop up.
Final Words
That’s all for Joyoshare Media Cutter. From the above, as will be readily seen, this program is a simple-to-use and full-featured video editor that is in a position to losslessly cut and flexibly edit various media files. With much effort and skill poured under the sun, it is not totally free. Just cost $29.95, you can enjoy it and its free upgrades for lifetime. Before becoming a registered user, it is advisable to try its free trial version, with which you receive complimentary use of it to cut and edit videos for 5 times.