Contents
Are you unable to find your network drive on the device? If the network drive doesn’t appear in File Explorer and you are unable to check your folders/files, don’t worry. If you are unable to access the drive after mapping it to another computer, try to find the exact reason for the issue. There are several reasons why the “Network drive not showing” error may appear on your screen.
Here, in this article, we will provide you with the causes of the missing network drive feature, and some easy ways to fix the network drive not showing error.
What Causes Network Drive Not Showing Up?
Before you learn any method to fix the Network drive not showing error, it is important to find the exact cause for the issue.
One of the main reasons for the “Network Drive Missing” error is the use of User Account Control (UAC). When you log in to your Windows system as an admin, you will get two options on the screen. One admin is given rights, while the other is without any rights. Every time when you connect other devices to your computer to store data in it, you map the drive programmatically. Sometimes, the network drive fails to connect with the desired device to map the drive without any admin permissions.
The shared network drive may not appear in the File Explorer if there is any network connection issue. When your device does not have a stable internet connection, the drive won’t appear on it. Some other reasons for Windows Network Drive missing are:
- Incorrect Network Path: If the network path you have mapped to the drive is incorrect, the drive will not appear.
- Group Policy Restrictions: Any sort of restrictions by the system administrator for the use of mapped network drives lead to issues when the drive won’t appear.
- Incorrect Drive Letter: If the drive letter you have assigned to the network drive is incorrect, the drive will not display in File Explorer.
- Corrupted System Files: Any corrupted file in your system that is related to the Network drive can also disappear.
How to Fix Network Drive Missing or Not Showing on Windows?
When the network drive is not showing on your Windows device, here are some easy ways to fix Network drive not showing error successfully. Just go through the following methods to solve your problem:
Method 01: Configure Network Proxy Settings
Configuring the proxy used to access network resources on your PC can help to resolve issues with the Network Drive. Proxy is the protocol that controls access to the internet. By correctly configuring the proxy on your device, the network gets able to access the network resources it needs to locate the missing drive. All you have to do is:
- Press Windows + I keys to open Settings and then select the Network and Internet.
- Now, click on “Change adapter options” located in the status pane.
- Right-click on the Ethernet and then select “Properties” from the list of options.
- Select the Internet Protocol Version 4 (TCP/Pv4) option located under the Networking tab.
- After that, select Properties. Make sure you select the “Obtain an IP address automatically” and “Obtain DNS server address automatically” options from the pop-up window that appears on your screen.
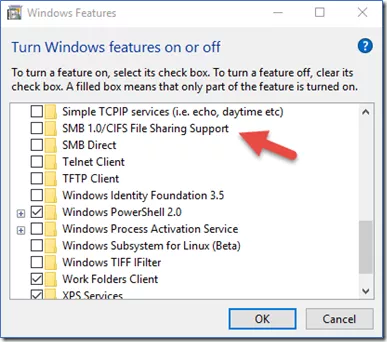
Method 02: Enable the SMB Features
Just like Proxy, Windows OS has the SMB feature that is used to share files and printers on a network. You can go through the following steps to enable SMB (Server Message Block protocol) features on your PC:
- Type “Programs and features” in the search box located in the bottom-left corner of your screen.
- Select the Turn Windows Features on or off option from the list of apps that appeared.
- Now, a “Windows Feature” pop-up will appear on your screen, where you need to check all the SMB features.

- Once you are done with the above steps, click the “OK” button and reboot your PC to save the changes that you’ve made.
Method 03: Map the Network Drive Using Command Prompt
You can even access and manage your network resources using the Command line. Go through the following steps to map the network drive via Command Prompt:
- Type CMD in the search box and open Command Prompt.
- Now, type the command: net use z: \\remote_ip\shared_folder /persistent:yes and press Enter key (Replace remote_ip with your PC’s IP address and the shared_folder with your shared folder’s name).
- To disconnect the network drive, you need to type the command: net use z: /delete.
How to Recover Deleted Files When Mapped Network Drive Not Showing?
If the above methods to fix Network drive not showing error somehow doesn’t work, you can format all the data on your drive. But this will lead to the deletion of all data from your drive. Don’t worry; you can use a professional data recovery software to restore your deleted files. There are many data recovery software available online that you can use to recover all the lost data without any extra effort. We recommend you to use the Stellar Data Recovery Professional tool as it is a 100% safe and secure option to recover all your data even without any backup.
Some amazing features of the Stellar Data Recovery Professional tool that make it best for your data recovery are:
- It can restore deleted files, photos, documents, and other types of files in a few simple clicks.
- Restores data from formatted, encrypted, or corrupted drives.
- You can use this tool to recover data from any storage drive, including internal & external hard drives, SSD, & others.
- This recovery tool is compatible with Windows 10/8.1/8/7.
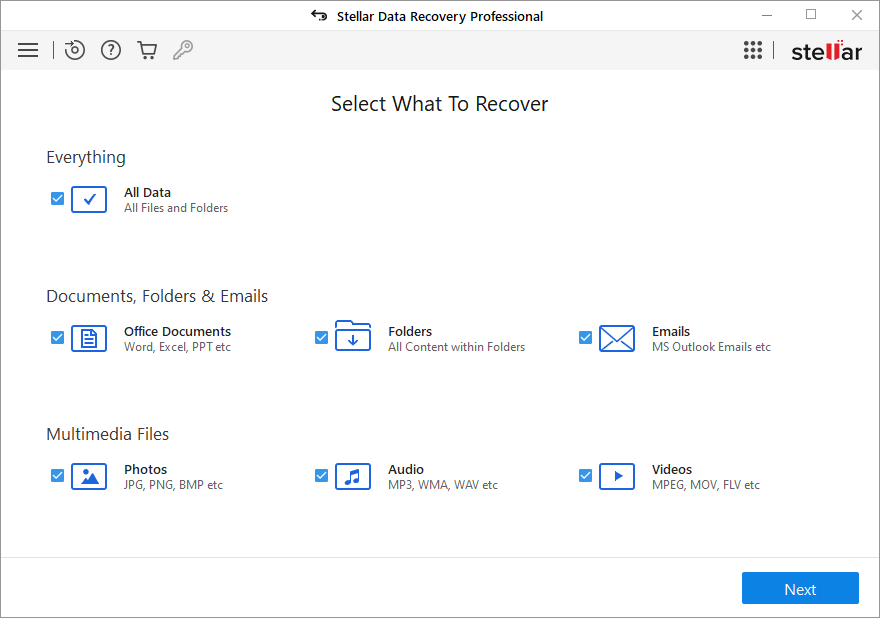
Recovering your data with the Stellar Data Recovery tool is relatively easy. Check the following steps to recover the data deleted from the disappeared hard drive using this professional data recovery software.
- First, download and install the Stellar Data Recovery Professional tool on your device.
- Launch the software and select the type of data you need to recover, and click the Next button.

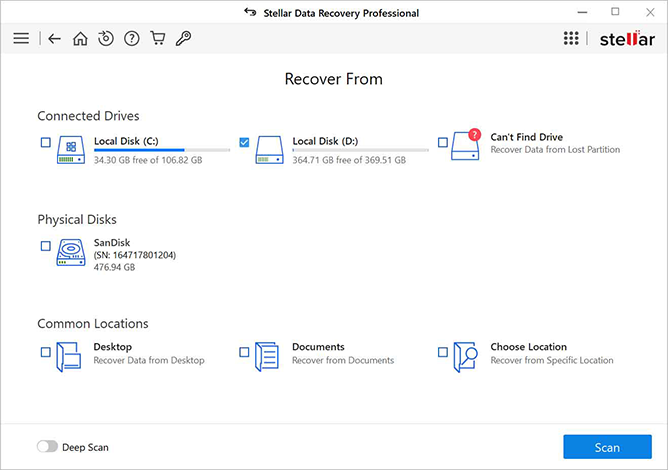
- Now, select the file location from where you need to recover your deleted data and click the Scan button.

- Once the scanning process gets completed, preview and select the files you want to recover. Click the “Recover” button to save the recovered data.
Conclusion
The above-mentioned easy ways to fix Network drive not showing errors will definitely help you. Just go with the aforementioned methods to resolve your problem with the network drive. Along with these workarounds, we have also provided how to restore hidden files for not displayed network drives. If any data loss occurs after formatting drive data, you can use the Stellar Data Recovery Professional tool to recover your lost data.