Vac Was Unable To Verify The Game Session: If you are facing a blunder like VAC was not capable to authenticate the game conference and speculating how to put right it, then you are at the right platform because our piece of writing will thoroughly let somebody know you on why this blunder happens and how to put right this error naturally.
Contents
- 1 What is VAC?
- 2 10 Ways to fix VAC Was Unable to Verify Your Game Session
- 2.1 Fix 1: Check Your Game Files
- 2.2 Fix 2: Reboot Your System
- 2.3 Fix 3: Run Steam Client As An Administrator
- 2.4 Fix 4: Restart the Steam Client
- 2.5 Fix 5: Repair Your Steam Client
- 2.6 Fix 6: Disable Third-Party Software
- 2.7 Fix 7: Exclude Game Directory From Antivirus Scans
- 2.8 Fix 8: Change to a New Account
- 2.9 Fix 9: Update the Graphics Driver of Your System
- 2.10 Fix 10: Reinstall CS:GO
- 3 Conclusion
Counter-Strike: Global Offensive (CS: GO), a multiplayer first-person handgun video game is the fourth game in the sequence of Counter-Strike. It’s urbanized by Valve and Hidden Path Entertainment, in addition, to has been gaining an assortment of the attractiveness of late because it’s complimentary now.
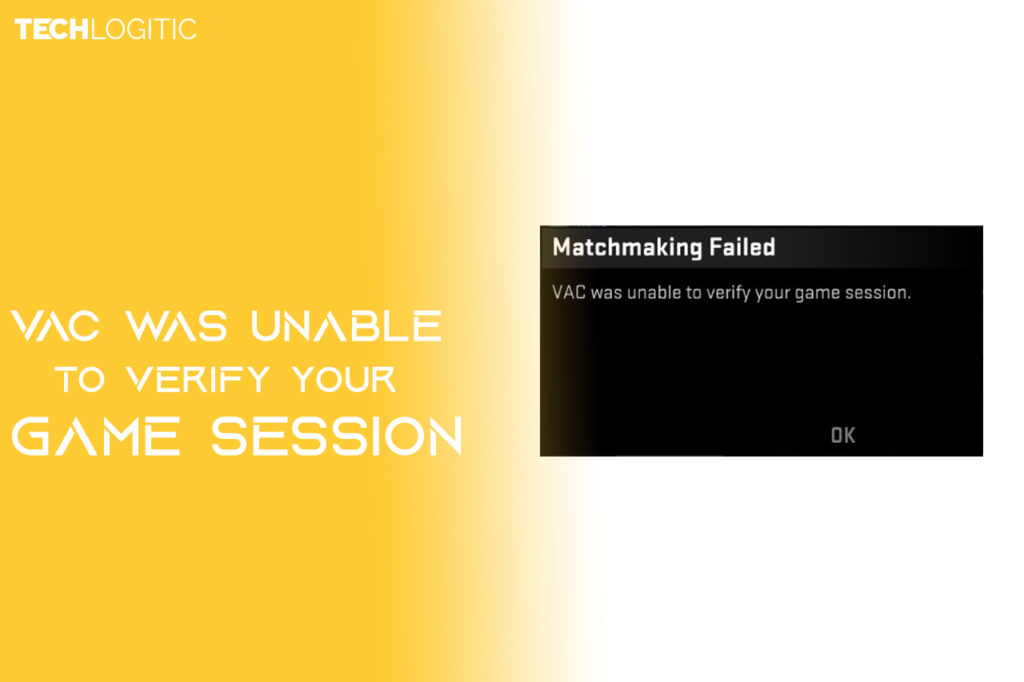
But a bunch of players have been coming across errors like “Matchmaking failed – VAC was incapable to verify the game session” just almost immediately as they commence the game. Thus, players cannot join matchmaking servers for the reason of this mistake. It can be in truth annoying at times, other than the superior news is that it’s fixable.
What is VAC?
VAC is the contraction for “Valve Anti-Cheat System”. This was developed to become aware of made to order installations furthermore configuration files of well-liked games. This in-built uncovering mechanism would in homecoming help to put off hackers from taking advantage of the games.
If you are powerless to bear out the game session, then it is pretty promising that a number of files of the game have been contaminated which is throwing up the blunder
Other than this, the most important reasons behind the CS: GO VAC not capable to authenticate error could be the following:
- Corrupted CS: GO files
- Some category of mistake with the Steam client
- Inability to arrive at VAC servers on Steam
- When submission privileges have been sanctioned improperly
- Some kind of Developer matter
Therefore, in this article we have provided a quantity of fixes to help out you fix VAC was incapable to verify the diversion session.
10 Ways to fix VAC Was Unable to Verify Your Game Session
Here are the speedy and trouble-free solutions to fix CS:GO VAC was not capable to verify the game session in 2020.
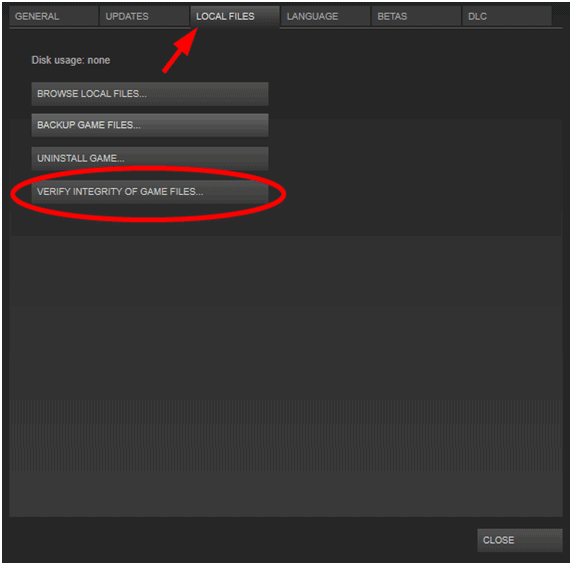
Fix 1: Check Your Game Files
If your sport files are corrupted, then it capacity be causing “CS:GO VAC was incapable to verify your game session” blunder. Here’s how you can troubleshoot it:
- Go to the Library segment in the Steam client menu.
- Click right on the game and select Properties from the context menu.
- Go to Local Files and click the option called “VERIFY INTEGRITY OF GAME FILES.”

- Once the corroboration of the Steam files development is absolute, shut up the window by clicking on close button.

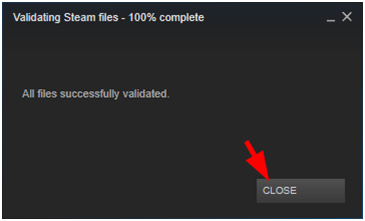
Now, start the CS:GO game to see if the predicament still persists or is entirely determined.
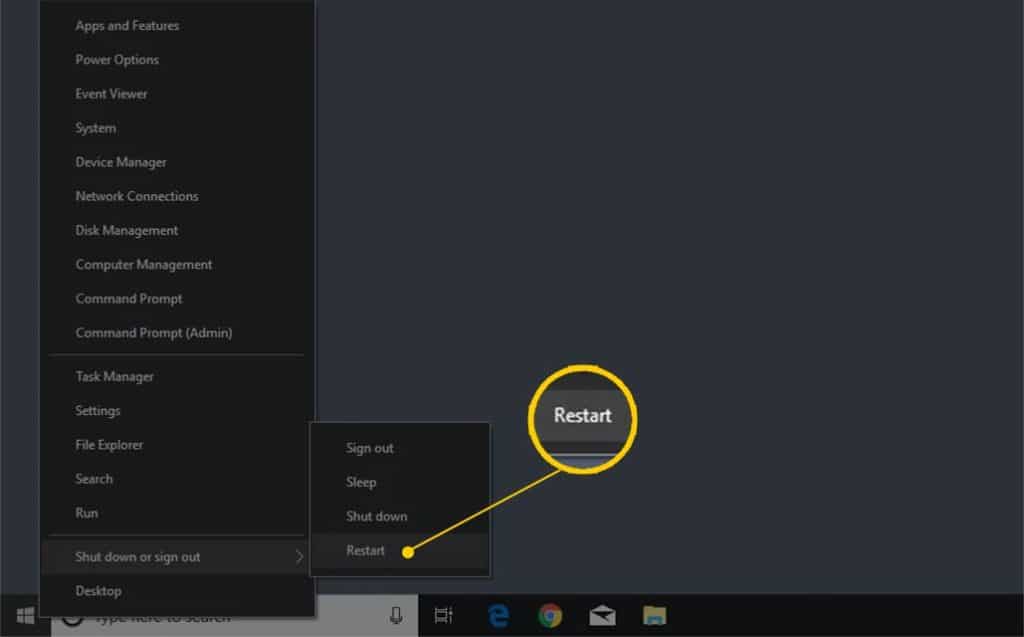
Fix 2: Reboot Your System
When the right of entry is being deprived of by your OS to the VAC examination, then you may move towards the CS:GO VAC powerless to verify blunder.
The read-write files that could do with to be confirmed by VAC could maybe be demonstrated by the antivirus key or disk indexing examination.
If such is the case then you possibly will basically restart the computer from the Start menu. Rebooting will put down the lid all operations and after that lend a hand you pick up where you left off your game error-free. However, if the blunder still persists then give the impression of being at the succeeding solutions.
Fix 3: Run Steam Client As An Administrator
You can put back into working order VAC was unable to verify the game session by administration the Steam client as a commissioner. When VAC is powerless to right to use the files, it then fails to authenticate the starting place.
This matter can be fixed by running Steam with running privileges:
- Exit from Steam fully.
- Find the way to the Steam installation directory and enter its position on the file browser: C:\Program Files (x86)\Steam
- Right-click on the Steam.exe file and choose the Properties option.
- Now confirm the box bordering to the “Run this program as administrator” underneath the Compatibility tab.

- Click on Apply and then select “OK.”
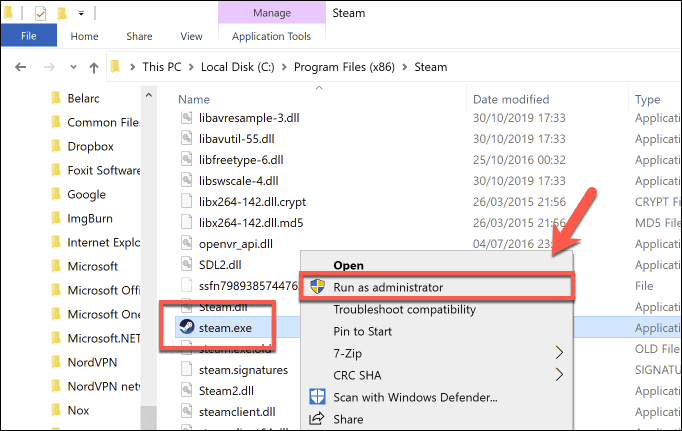
Post this, make sure the question to distinguish if it is determined or not.
Fix 4: Restart the Steam Client
Getting the blunder of “CS:GO VAC unable to verify” is not your mistake but it happens outstanding to some defilement and manoeuvring issues with the Steam client. Begin by preliminary flipside the Steam arrangement operations.
Let us come across the technique in which you can start again the system.
- Steam is in black and white on the upper left angle and you encompass to click on it and then tap on the Exit button.
- Go to the Steam Client and open it again.
- Press Steam again and make sure you click on the “go offline,”button.
- Now endeavour to tap “Restart in offline mode.”
- Tap Steam another time and then tap on“go online.”
- Press the Restart button and subsequently hit the button
- Launch the game again, in addition, to confirm if you are still getting the inaccuracy message.
Fix 5: Repair Your Steam Client
Now, if you are motionless not done, then you enclose to patch up the Steam client. Go behind the steps below to patch up your Steam client to acquire liberate of the CS:GO VAC unable to validate error:
- Press on the steam and afterwards exit from it.
- Press on your computer’s start button.
- Type on the “Command Box” when it becomes visible.
- Press on the “Run on Administrator” button.
- Type on the C: Program File
- Press on Enter within your keyboard.
- Once another time press on Steam and run the Steam Client.
Fix 6: Disable Third-Party Software
Sometimes third-party software cans divergence with the game in addition to cause “VAC was unable to verify the game session.” In this case, you could do with uninstalling undependable third-party software from the central processing unit.
You can accomplish this by visiting the Control Panel in addition to uninstalling the undependable apps by clicking right on their given name and selecting the “Uninstall” alternative.
Fix 7: Exclude Game Directory From Antivirus Scans
When the antivirus starts to look into the game directory submissively, then it may source CS:GO VAC’s inability to authenticate the gaming session.
So, if you are questioning how to renovate this predicament, then don’t be troubled because it’s very trouble-free. Just whitelist the game in addition to the Steam directory to put off the antivirus without human intervention scanning them.
Visit the antivirus program settings and append the game as well as Steam directory to the disqualified folders catalogue.
Fix 8: Change to a New Account
Some users encompass in addition suggested that the VAC confirmation error could what’s more be linked to your account. You can revolutionize your account in the subsequent way to occupy yourself games:
- Visit Steam and click on the Steam menu button.
- Then revolutionize your account by creating an original account.
Fix 9: Update the Graphics Driver of Your System
Whenever there is any question with the games on your system or the optical components of your arrangement and if the higher than fixes haven’t been constructive so far, then it possibly will point towards that your classification is facing a fundamental issue.
It could be contaminated or non-operational drivers which are most important to the “VAC was incapable to verify the game session” error. Below is the explained progression of how to update graphics card drivers.
Updating the explicit drivers with Bit Driver Updater tool can facilitate you make your mind up your VAC and Steam client matter from top to bottom.
You can visit the bureaucrat website of the Bit Driver Updater tool and mount it on your system. You can then run an absolute system scan with the implement to recognize possible driver-related issues.
Next, you bring up to date and install the most modern driver versions with lending a hand of the one-click update characteristic.
Post this, access Steam and distinguish if you are intelligent to engage in recreation of the game and if your system is implemented smoothly. If so, then broken down drivers were the reasons behind the VAC issue.
Fix 10: Reinstall CS:GO
In due course, if all else turns out to be unsuccessful, then you can endeavour to reinstall the Steam client to get to the bottom of the problem of CS:GO VAC was unable to authenticate your game session.
Doing this will put back into working order rogue settings and lend a hand the game access the right files. Go to the Steam Library and locate the CS:GO game. Then, you can right-click on the name of the game to select the option of manage. You can then prefer the uninstall option to kick off the uninstallation process.
Finally subsequent to CS: GO is absolutely uninstalled, you can another time right-click on the game to install it once another time on your arrangement.
Conclusion
So, here we are at the finishing point of the “VAC was unable to verify the game session” blog. Hopefully, our solutions and proposition worked for you.
If all the higher than tricks fail, then one eventual thing that you can endeavour is contacting the developers by the use of email. You can give an explanation of your issue in element to the support team and seek a declaration from them.
They have to be able to search out your game back into the precise shape and you should be clever enough to play your game another time effortlessly.