Contents
Have you ever tried to run CHKDSK on startup in Windows 10 to check and repair hard disk errors? If you are not skilled when operating it, congratulations, you come to the right place. In the following paragraphs, I will show you several ways to run disk check on Windows 10 startup to when your computer can’t turn on successfully.
However, you can also choose to stop CHKDSK in startup when you feel it’s troublesome to run it every time when startup. If data loss (due to hard disk errors) occurs unfortunately, a practical data recovery method will be introduced to help you rescue lost data from Windows 10.
Part 1: 4 Ways to Run CHKDSK on Startup Windows 10
Since running CHKDSK is impossible when the drive is in use, you have to run CHKDSK before boot if you want to scan the system (or related) drives to check and fix disk errors. Here, you can follow these ways to accomplish the work.
1. Run CHKDSK on Startup with Command Prompt
① Press Windows + R and put in cmd. Then, press Ctrl + Shift + Enter to access Command Prompt.
② Type this command: chkdsk C: /f /r /x in command Prompt and press Enter. C can be replaced with drive letter of the target drive. Do not forget the spaces within this command.
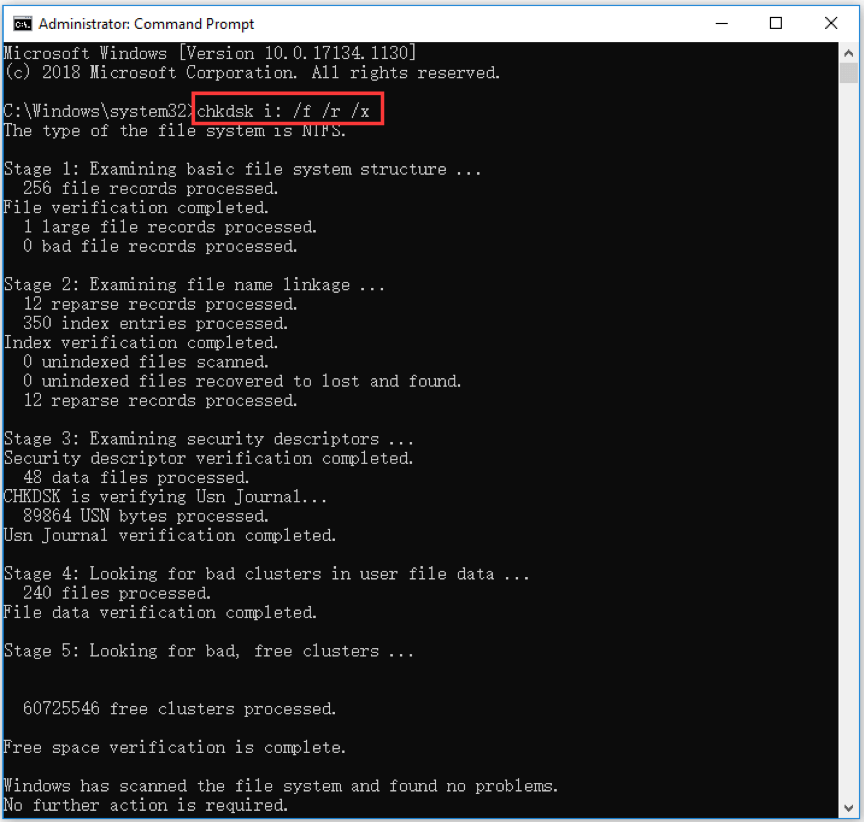
③ If you intend to check system drive, a pop-up message will inform that the current drive can’t be locked as it’s used by another process, and inquire if you want to schedule this drive to be scanned next time when system reboots. Put in Y and hit Enter.
④ Exit command Prompt and restart computer. Windows will run CHKDSK on reboot to scan and fix hard drive errors automatically.
2. Run Disk Check on Startup from Advanced Options Screen
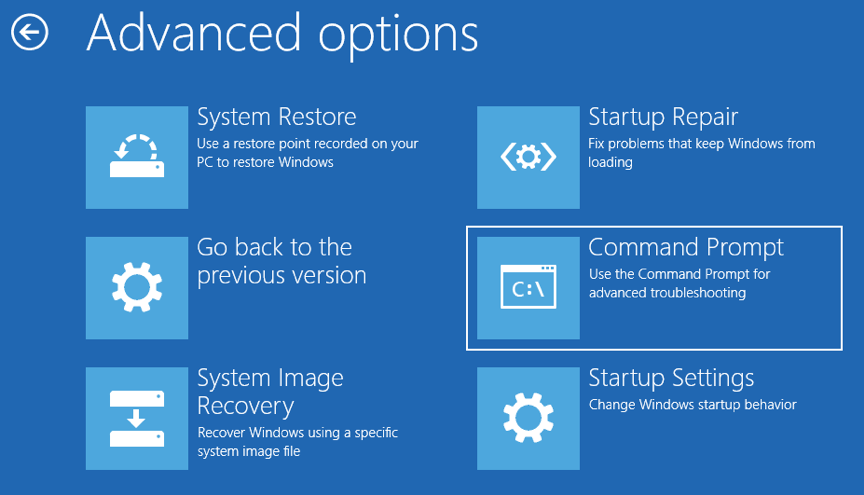
① First of all, access advanced startup options in Windows 10 this way: click Start > Settings > Update & Security > Recovery > Restart now (button under Advanced startup).
② Then, choose Command Prompt to boot computer into Command Prompt, so that you can run CHKDSK command explained in previous part to scan and fix computer hard drive errors before it boots into Windows.
3. Run CHKDSK on Startup with Recovery Disk
① When your Windows 10 can’t boot normally, you can choose boot from recovery disk if are able to create a Windows 10 recovery drive or disk.
② Then boot your computer into Windows Recovery Environment with this recovery disk or USB.
③ After that, click Troubleshoot > Advanced options > Command Prompt and use chkdsk /f /r command to run CHKDSK.
4. Run CHKDSK on Startup with Installation Media
When your Windows 10 can’t boot, you have another method to run CHKDSK is using installation media, which can be made by Windows 10 media creation tool. Then, use the installation media to boot your computer into WinRE. Select Command Prompt option in the Advanced options screen.
In this way, you can also run CHKDSK command to check and repair disk errors.
Part 2: How to Stop CHKDSK on Startup Windows 10
As CHKDSK scanning may take some time, you can choose to stop it from running at startup in Windows 10 of course. Please check the solutions in the following section.
1. Press Any Key to Cancel
If you didn’t close your Windows 10 properly, Window CHKDSK will auto run next time when your start the computer. And you’ll receive a message telling you can proceed to run the disk check, or cancel it by pressing any key. Here, just press an any key to stop CHKDSK scanning on startup in Windows 10.
2. Cancel CHKDSK on Startup with Registry Editor
① Open Run box (by pressing Windows + R) and type regedit in it. Press Enter to go to Registry Editor.
② Navigate this path: HKEY_LOCAL_MACHINE > SYSTEM > CurrentControlSet > Control > Session Manager.
③ Double click BootExecute and delete all lines under Value data, but keep autocheck autochk *.
④ Then, exit Registry Editor and restart computer to see if CHKDSK works or not at startup.
Part 3: Best CHKDSK Alternative – Partition Wizard
Compared with running CHKDSK on startup Windows 10, using a third-party free disk manage program to check and fix disk errors is more time-saving, like MiniTool Partition Wizard.
MiniTool Partition Wizard is a professional partition manager for Windows. Except for scanning and fixing disk errors, you can make use of it to finish other operations, such as delete/wipe/format/create/resize partitions, copy disk, migrate OS and so on.
Now, let’s go to see how to check and fix disk errors with Partition Wizard.
Step 1: Download and install this software on your Windows 10 computer. Open it to get the main interface.
Step 2: Right click the target partition and click Check File System option. Then, choose check & fix file system error option, and click Start. Partition Wizard will check and fix the errors on the disk automatically.
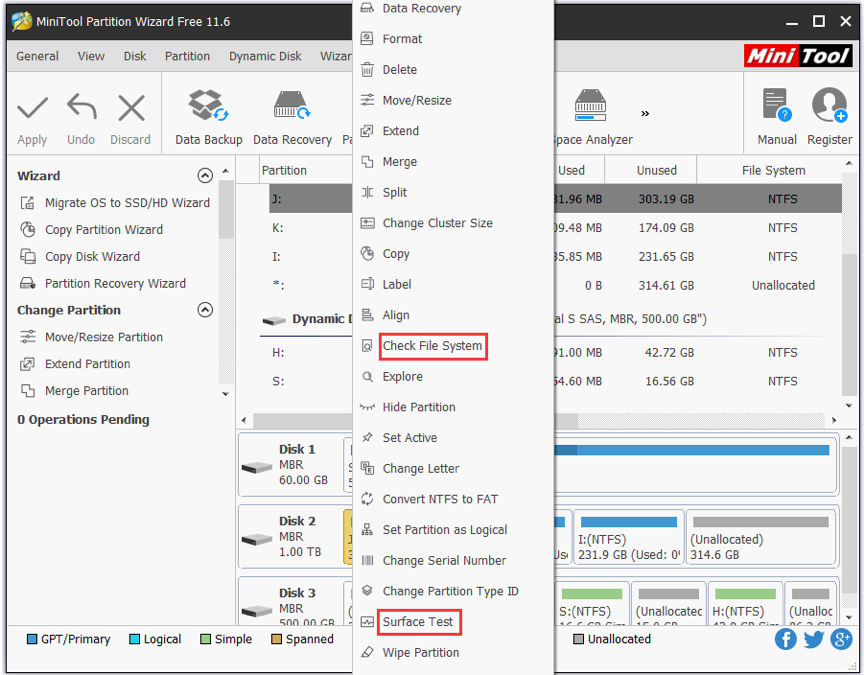
Step 3: If you want to diagnose whether the hard drive has bad sectors, just go back to the main interface and right click the target partition to select Surface Test option. Hit Start Now to begin the work.
Final Words
This tutorial mainly introduces different ways to run CHKDSK on startup and stop CHKDSK in Windows 10. Now, you can have a try if you want to check the hard drive. Please contact us by leaving a comment below if you have other questions about run CHKDSK and Partition Wizard.