Contents
Your network settings are probably incorrect if you’re experiencing err_network_changed issues on your Windows machine. However, there are a few simple fixes you may try out to go browsing again quickly.
You must attempt each technique because different problems might cause this error and other solutions could work with one individual but not for another.
How should I interpret this error message?
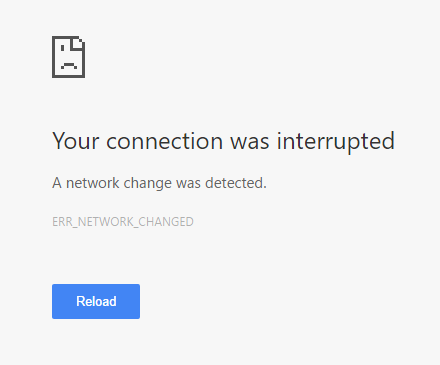
Simply put, the err_network_changed error prevents a user from accessing a webpage by impeding its usual loading. It is crucial to consider a variety of remedies to this issue because there are many potential causes for this error. What may be effective for someone else may not be effective for you.
You have two options for how the problem is displayed: “Unable to connect to the network. Your connection was halted or err_network_changed. There was a network change found. Your internet connection should be checked. It is a persistent issue affecting all widely used websites, including YouTube, Gmail, Facebook, and others. Finding a workable solution to this problem is therefore essential.
Err_network_changed Errors: How to Fix Them?
An alteration to your computer’s network setup is typically what the err_network_changed issue normally denotes. The browser’s network connection to the internet is being stopped or interrupted by that adjustment. To correct the error, we must deal with this.
A few tried-and-true fixes are discussed in the troubleshooting guide that is provided below:
Restart the modem once:
Let’s begin with the simple answers before moving on to some more complicated ones. Sometimes an issue is easier to solve than it first appears. There could have been internal or technological problems that led to the error. Restarting your connection might be an effective option in this situation. If you still can’t resolve this problem, try the next approach.
Remove Chrome Browsing History:
- To access Chrome’s history, open the browser and click “Ctrl + H.”
- To erase completely, select “Begin of History” when you click “Clear Browsing Data.”
- Ensure that these are chosen as well:
Ad, Cache files and images, Data that fills up forms automatically, Passwords, Website and application data, including cookie, Search history, History of downloads
- After that remove all browsing data.
- After Chrome has finished, shut it off and restart your computer.
- Reload Chrome after a restart to check if the err_network_changed error has disappeared.
Reboot your router and computer:
Begin with a connection and PC restart, since most Technical support will advise. Restart your router and PC. As of right now, if the browser is giving you errors, see whether your broadband connection is active and functional. When attempting to browse, make sure a software VPN is not running on the machine.
Try the following remedy if you’re still getting the issue.
After Chrome has finished, shut it off and restart your computer. Open Chrome after a restart to check if the err_network_changed error has been fixed.
Examine Your DNS Configurations:
You should examine your DNS settings if none of the other fixes worked:
- Tap on the application after typing “Control Panel” into the Start menu.
- Go to the Internet and networks next.
- Modify adapter settings may now be found in the left pane of the Networking and Sharing Center by clicking there.
- You may choose Properties by right-clicking your network adapter.
- Select the Properties option in the window after selecting Internet Protocol Version 4.
- To add 8.8.8.8 and 8.8.4.4 as the servers, select other buttons, “Use the following DNS…,” if “Obtain DNS server address automatically” is chosen. Retest, then click OK. If you had DNS servers set to automatic, switch them back to manual, click OK, and retest.
If DNS was the problem, then this is the solution.
The network interface card should be disabled and enabled:
- After pressing the Windows key and R, enter ncpa.cpl and press Enter.
- Now choose with the right mouse button the NIC that is having trouble.
- After a short period of time, select Disable once more.
- Wait until an IP address is successfully received.
- Type the following commands in cmd if the problem continues:
ipconfig /flushdns

ipconfig /release

ipconfig /renew
- To check if it works, restart your device.
Removing Proxy:
- Enter “inetcpl.cpl” by pressing the “Windows key + R” combination.
- From the “Connections” tab, choose “LAN Settings.”
- Remove the check mark next to “Use a Proxy Server for the LAN” and make sure “Automatically Detect Settings” is selected.
- Before restarting your computer, select “OK,” then “Apply.”
Stop the power-saving mode:
When the power-saving mode is activated on Windows 10, the wifi adapter turns off. This disrupts the net connection and thus results in the system change error. Follow these actions to get rid of this issue’s source:
- Find Device Manager by clicking the Start button and typing it in.
- The Properties menu can be accessed by performing right-clicking on the access point you are presently using.
- Get there by selecting the Power Management option.
- Switch off the option that says “Allow the system to turn this device off to save power.”
- Reload the website on Google Chrome by clicking OK.
Conclusion
Networking mistakes can occur for a number of reasons, and they frequently occur when least expected. But now that you are aware of how to fix the problem, you can return to your previous activity.
I sincerely hope that this post was informative enough to inform you of cures.